Cease the Drip: Your Complete Information to Sink Leak Detection and Restore
A dripping sink is not simply an annoyance; it is a signal of potential water harm, wasted assets, and escalating utility payments. Whether or not it is a persistent drip from the tap or a extra insidious leak beneath the cupboard, understanding the causes, figuring out the supply, and figuring out how you can tackle a sink leak is essential for each house owner. This complete information supplies you with the skilled information and sensible steps to deal with sink leaks head-on, saving you cash and stopping expensive repairs. We’ll cowl all the pieces from fundamental diagnostics to superior restore methods, guaranteeing you’ve gotten the arrogance to resolve commonest sink leak eventualities.
Understanding the Anatomy of a Sink and Potential Leak Sources
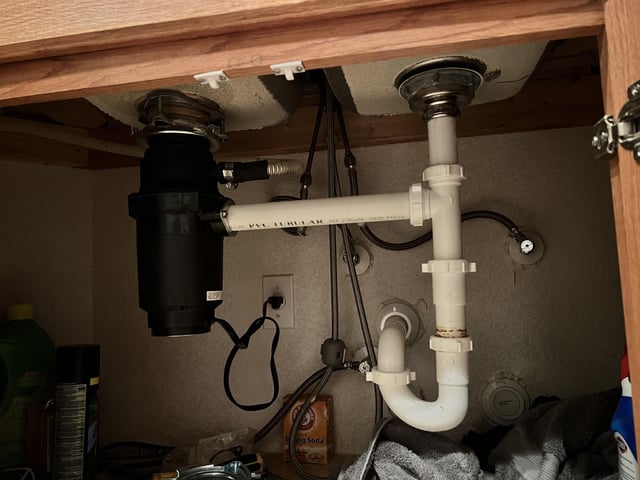
Earlier than diving into leak detection and restore, it is important to know the elements of a typical sink setup. This information helps pinpoint the supply of the leak extra successfully. A normal sink system consists of:
- Faucet: The fixture that controls water stream. Leaks typically originate from the bottom, deal with, or spout.
- Provide Strains: Versatile tubes connecting the shut-off valves to the tap. These can corrode or loosen over time.
- Shut-Off Valves: Positioned beneath the sink, these valves management the water provide. Leaks can happen across the valve stem or connections.
- Drain Meeting: Consists of the sink strainer, tailpiece, P-trap, and drainpipe. Every connection is a possible leak level.
- P-Entice: The curved pipe beneath the sink that traps particles and prevents sewer gases from coming into your private home.
Understanding how these elements work together is step one in diagnosing and resolving a sink leak.
Widespread Causes of Sink Leaks: An Skilled Overview
A number of components can contribute to sink leaks. Figuring out the basis trigger is essential for efficient restore. Listed below are a few of the commonest culprits:
- Worn-Out Washers and O-Rings: Over time, the rubber washers and O-rings inside the tap can deteriorate, resulting in drips.
- Unfastened Connections: Vibrations and regular put on can loosen connections on provide strains, drainpipes, and tap elements.
- Corrosion: Mineral buildup and corrosion can harm pipes and fittings, creating weak spots and leaks.
- Excessive Water Strain: Extreme water stress can pressure plumbing elements, rising the chance of leaks.
- Clogged Drains: A clogged drain may cause water to again up, placing stress on drain connections and resulting in leaks.
- Broken or Cracked Pipes: Bodily harm or age may cause pipes to crack, leading to important leaks.
Leak Detection: A Step-by-Step Information to Discovering the Supply
Discovering the precise location of a sink leak can typically be difficult, as water can journey alongside pipes and surfaces. Comply with these steps to systematically determine the supply:
- Dry the Space: Use a towel to totally dry the realm beneath the sink, together with all pipes, connections, and the cupboard ground.
- Examine the Faucet: Test for drips across the base, deal with, and spout. Search for indicators of mineral buildup or corrosion.
- Test the Provide Strains: Fastidiously look at the availability strains for any indicators of moisture, corrosion, or kinks. Really feel alongside the strains for dampness.
- Examine the Shut-Off Valves: Test for leaks across the valve stem and connections. Use a dry material to wipe the realm and see if any moisture seems.
- Study the Drain Meeting: Search for leaks across the sink strainer, tailpiece, P-trap, and drainpipe connections. Run water down the drain and observe for any leaks.
- Test the P-Entice: Examine the P-trap for cracks or harm. Make certain the connections are tight.
- Search for Water Injury: Examine the cupboard ground and surrounding areas for indicators of water harm, comparable to stains, mildew, or warping.
If you happen to’re nonetheless unable to find the leak, think about using a flashlight and mirror to examine hard-to-reach areas. Keep in mind to test the realm instantly after operating the water; typically the leak is barely obvious when the system is in use.
Important Instruments and Supplies for Sink Leak Restore
Earlier than making an attempt any repairs, collect the mandatory instruments and supplies. Having all the pieces available will make the method smoother and extra environment friendly. Right here’s an inventory of important objects:
- Adjustable Wrench: For tightening and loosening nuts and bolts.
- Basin Wrench: For reaching difficult-to-access nuts on the tap.
- Pliers: For gripping and manipulating small elements.
- Screwdrivers (Phillips and Flathead): For eradicating screws.
- Plumber’s Tape (Teflon Tape): For sealing threaded connections.
- Plumber’s Putty: For sealing across the sink strainer.
- Alternative Washers and O-Rings: For repairing faucet leaks.
- New Provide Strains: If the present strains are corroded or broken.
- Bucket: To catch dripping water.
- Towels: To scrub up spills and dry surfaces.
- Security Glasses: To guard your eyes.
- Gloves: To guard your palms.
Relying on the particular sink leak, you might want extra instruments or supplies. At all times seek the advice of with an skilled in case you are not sure.
Step-by-Step Restore Information for Widespread Sink Leaks
As soon as you’ve got recognized the supply of the sink leak and gathered the mandatory instruments, you’ll be able to start the restore course of. Listed below are some step-by-step guides for frequent leak eventualities:
Repairing a Leaky Faucet
- Flip Off the Water Provide: Find the shut-off valves beneath the sink and switch them off.
- Disassemble the Faucet: Fastidiously disassemble the tap, following the producer’s directions.
- Examine and Exchange Worn Elements: Study the washers, O-rings, and cartridges for put on or harm. Exchange any worn elements with new ones.
- Reassemble the Faucet: Reassemble the tap, ensuring all connections are tight.
- Flip On the Water Provide: Slowly activate the water provide and test for leaks.
Tightening Unfastened Connections
- Find the Unfastened Connection: Establish the unfastened connection on the availability strains, drainpipes, or faucet elements.
- Tighten the Connection: Use an adjustable wrench to fastidiously tighten the connection. Watch out to not overtighten, as this may harm the becoming.
- Test for Leaks: Activate the water provide and test for leaks. If the leak persists, strive making use of plumber’s tape to the threads earlier than tightening the connection.
Changing Corroded Provide Strains
- Flip Off the Water Provide: Find the shut-off valves beneath the sink and switch them off.
- Disconnect the Previous Provide Strains: Disconnect the previous provide strains from the shut-off valves and the tap.
- Set up the New Provide Strains: Join the brand new provide strains to the shut-off valves and the tap, ensuring the connections are tight.
- Flip On the Water Provide: Slowly activate the water provide and test for leaks.
Addressing Leaks within the Drain Meeting
- Flip Off the Water Provide: Cease utilizing the sink to forestall extra water from coming into the drain.
- Disassemble the Drain Meeting: Fastidiously disassemble the drain meeting, beginning with the P-trap.
- Examine the Elements: Test the drainpipe, tailpiece, and P-trap for cracks, clogs, or harm.
- Clear and Reassemble: Clear the drain elements and reassemble, guaranteeing all connections are safe.
- Take a look at the Drain: Run water and look ahead to leaks.
Preventative Measures to Keep away from Future Sink Leaks
Stopping sink leaks is at all times higher than coping with the aftermath. Listed below are some preventative measures you’ll be able to take to reduce the chance of leaks:
- Usually Examine Plumbing: Periodically examine your sink plumbing for indicators of leaks, corrosion, or harm.
- Tighten Unfastened Connections: Test and tighten unfastened connections on provide strains and drainpipes.
- Exchange Worn Elements: Exchange worn washers, O-rings, and provide strains earlier than they fail.
- Keep away from Harsh Chemical substances: Keep away from utilizing harsh chemical compounds to scrub your sink, as they will harm pipes and fittings.
- Flush Drains Usually: Flush your drains with scorching water to forestall clogs.
- Management Water Strain: Guarantee your water stress is throughout the beneficial vary to forestall pressure on plumbing elements.
When to Name a Skilled Plumber
Whereas many sink leak repairs could be dealt with by owners, some conditions require the experience of knowledgeable plumber. Think about calling a plumber if:
- You’re unable to find the supply of the leak.
- The leak is brought on by a broken or cracked pipe.
- You’re uncomfortable working with plumbing.
- The restore requires specialised instruments or information.
- You observed there could also be underlying plumbing points.
Trying to repair a fancy plumbing challenge with out the correct information and instruments can result in additional harm and expensive repairs. When unsure, it is at all times greatest to seek the advice of with knowledgeable.
The Significance of Addressing Sink Leaks Promptly
Ignoring a sink leak can have critical penalties. Even a small drip can waste a major quantity of water over time, resulting in greater water payments. Extra importantly, leaks may cause water harm to your cupboards, flooring, and partitions, doubtlessly resulting in mildew progress and structural issues. Addressing leaks promptly can prevent cash, forestall expensive repairs, and defend your private home from water harm.
Skilled Insights for a Dry and Fear-Free Sink
Addressing a sink leak promptly prevents water harm, mildew progress, and wasted assets. By understanding the anatomy of your sink, detecting leaks early, and following our step-by-step restore information, you’ll be able to confidently deal with commonest sink leak eventualities. Keep in mind to prioritize preventative upkeep and do not hesitate to name knowledgeable plumber when wanted. Taking these steps will guarantee a dry and worry-free sink for years to return. You probably have additional questions or wish to share your personal suggestions for coping with sink leaks, please depart a remark under.
